引论 在在Android Studio中发布Library到jCenter公共仓库 中,我们知道了1
2
3
repositories {
jcenter()
}
是如何工作的,也知道了如何向全球公共仓库提交自己的Library。1
2
3
4
repositories {
jcenter()
maven { url "http://localhost:8081/artifactory/libs-release-local" }
}
在此处url是一个本地仓库,也可能是网络的某个位置。
还有其它的库管理应用,因为我们的开发与jCenter尝试整合,就不考虑其它的了,给出列表供参考。Repository Management Tools
搭建artifactory JDK artifactory本身是一个开源的Java EE应用,确保机器上有JDK运行,推荐使用最新的JDK8,JDK7官方已不再更新,artifactory也对JDK7支持不好。1
2
3
4
➜ Downloads java -version
java version "1.8.0_60"
Java(TM) SE Runtime Environment (build 1.8.0_60-b27)
Java HotSpot(TM) 64-Bit Server VM (build 25.60-b23, mixed mode)
artifactory 下载Artifactory 后解压zip包,可以直接运行,已包含Tomcat容器。1
➜ Downloads ./artifactory-oss-4.1.3/bin/artifactory.sh
看到
Done,本地的artifactory已经运行起来了,浏览器打开http://localhost:8081/artifactory/
发布 配置Gradle 在Project/build.gradle下添加:1
2
3
4
5
6
buildscript {
dependencies {
//添加引用位置
classpath "org.jfrog.buildinfo:build-info-extractor-gradle:3.1.1"
}
}
在Library/build.gradle中添加:1
2
3
4
5
6
7
8
9
10
11
12
13
14
15
16
17
18
19
20
21
22
23
24
25
26
27
28
29
30
31
32
33
34
35
36
37
38
39
40
41
42
//plugin要添加到apply plugin: 'com.android.library' 之后
//添加上传所需的插件
apply plugin: 'com.jfrog.artifactory'
apply plugin: 'maven-publish'
//定义包名和版本号
def packageName = 'com.geek.dev'
def libraryVersion = '1.0.2'
publishing {
publications {
aar(MavenPublication) {
groupId packageName
version = libraryVersion
artifactId project.getName()
// Tell maven to prepare the generated "*.aar" file for publishing
artifact("$buildDir /outputs/aar/${project.getName()} -release.aar" )
}
}
}
artifactory {
contextUrl = 'http://localhost:8081/artifactory'
publish {
repository {
// The Artifactory repository key to publish to
repoKey = 'libs-release-local'
username = "admin"
password = "password"
}
defaults {
// Tell the Artifactory Plugin which artifacts should be published to Artifactory.
publications('aar' )
publishArtifacts = true
// Properties to be attached to the published artifacts.
properties = ['qa.level' : 'basic' , 'dev.team' : 'core' ]
// Publish generated POM files to Artifactory (true by default)
publishPom = true
}
}
}
运行发布 在Terminal Panel中运行:1
./gradle assembleRelease artifactoryPublish
看到发布结果:1
2
3
4
5
6
Deploying artifact: http://localhost:8081/artifactory/libs-release-local/com/geek/dev/weatherlib/1.0.2/weatherlib-1.0.2.aar
Deploying artifact: http://localhost:8081/artifactory/libs-release-local/com/geek/dev/weatherlib/1.0.2/weatherlib-1.0.2.pom
Deploying build descriptor to: http://localhost:8081/artifactory/api/build
Build successfully deployed. Browse it in Artifactory under http://localhost:8081/artifactory/webapp/builds/WeatherLibrary/1445153016002/2015-10-18T15:23:35.938+0800/
BUILD SUCCESSFUL
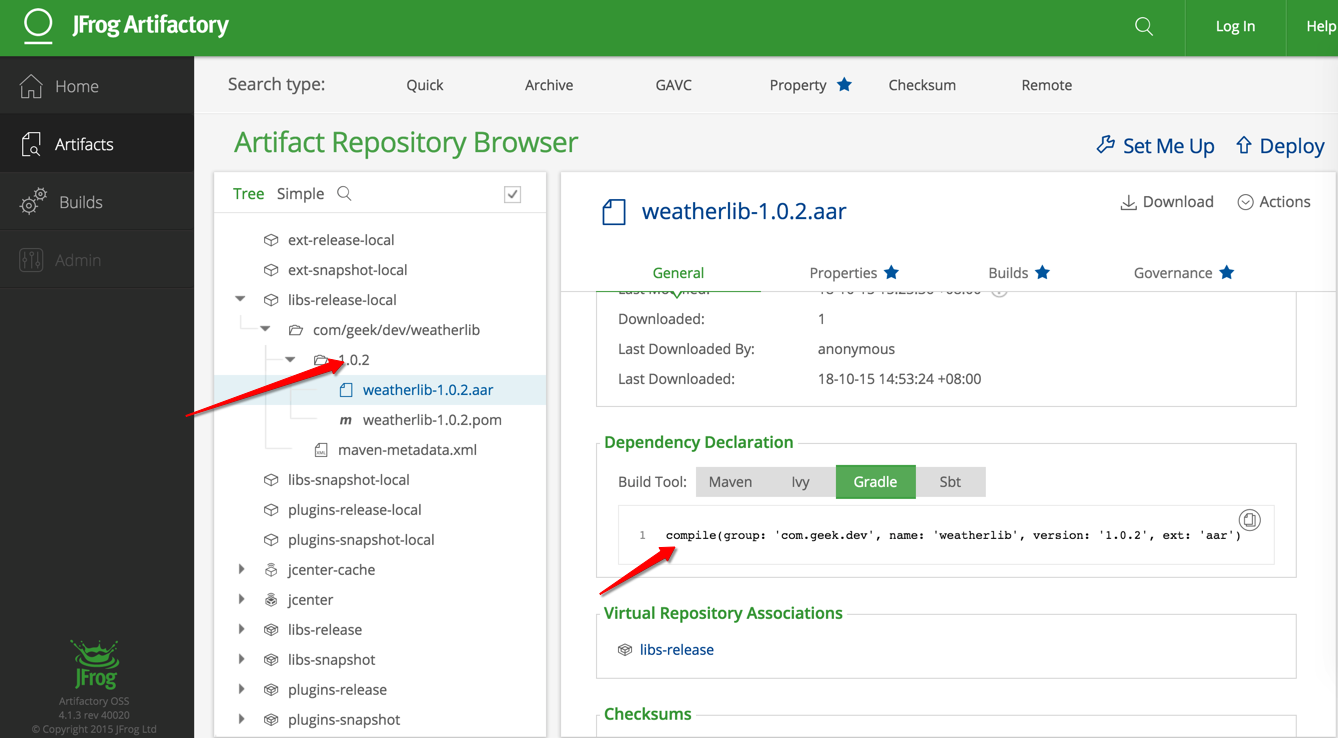
到http://localhost:8081/artifactory/ 里验证:
使用本地库 在Project/build.gradle中添加本地库:1
2
3
4
5
6
7
allprojects {
repositories {
jcenter()
maven { url "http://localhost:8081/artifactory/libs-release-local" }
}
}
在Module/build.gradle中添加依赖,格式如上图:1
2
3
4
5
6
dependencies {
compile fileTree(dir: 'libs' , include: ['*.jar' ])
compile 'com.android.support:appcompat-v7:23.0.1'
compile(group: 'com.geek.dev' , name: 'weatherlib' , version: '1.0.2' , ext: 'aar' )
}
总结 通过本文的介绍,可以掌握为自己或团队搭建本地库以及让如何使用,系统跑起来了,流程走通了,再进行深入细化,artifactory权限、服务器管理等等。
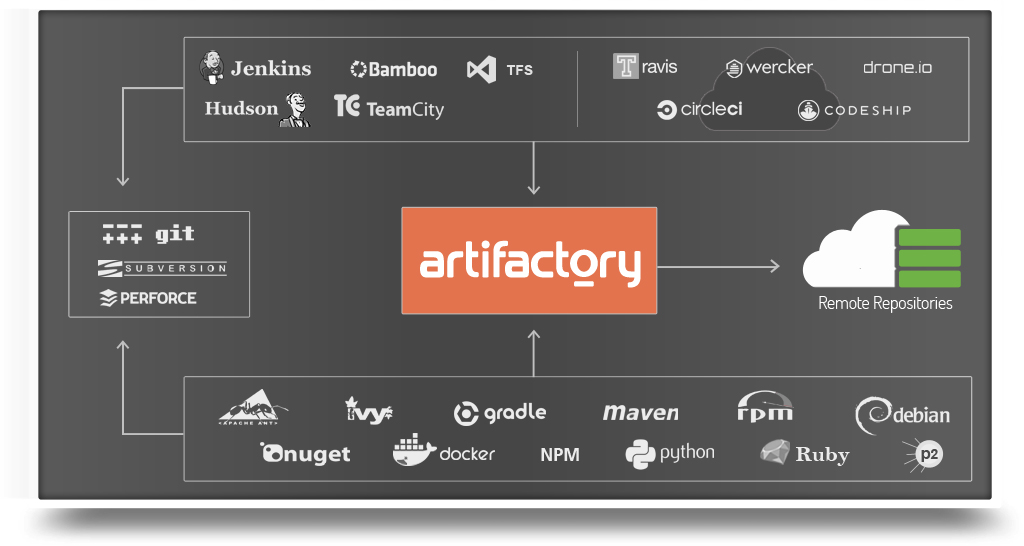
References https://www.jfrog.com/wp-content/uploads/2014/05/artifactory_overview_diagram.jpg
distribute to maven centeral